The Sniper binary options strategy exists in many variations, as numerous traders have attempted to improve on the original. Some versions proved less effective; others turned out to be better than the original.
One of the strategy's key advantages is that it relies entirely on standard indicators available on most platforms and terminals.
How the Sniper Binary Options Strategy Works
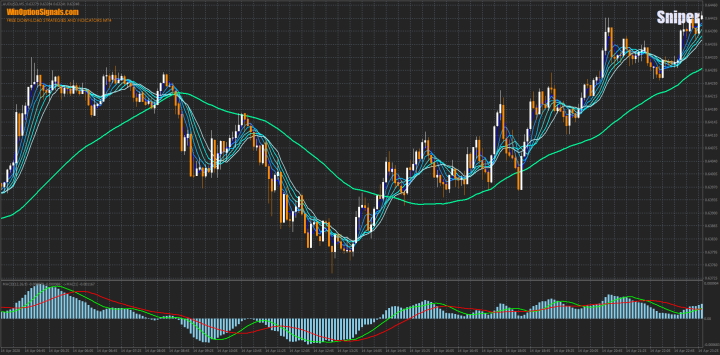
The strategy is built around the Moving Average trend indicator and the MACD oscillator. The Moving Averages used here are exponential — a form that many traders may be less familiar with. This combination works as follows: the Moving Averages determine the direction of price movement, while MACD identifies when that movement is losing momentum. Together, they produce reliable entry signals.
The strategy also supports additional entries on pullbacks along the trend, which can increase overall profitability.
Indicator Setup and Installation
New traders may worry that this many indicators will clutter the chart and complicate trading. In practice, all the indicators fit together naturally and do not interfere with one another. The signals they produce are clear and straightforward. Crucially, every indicator used is available as a standard built-in on virtually any platform that supports technical analysis — no third-party terminals are required.
Indicator parameters:
- EMA (Exponential) — 6 instances with periods 3, 5, 7, 9, 11, and 13.
- EMA (Exponential) — period 55.
- EMA (Exponential) — period 21.
- MACD — default settings.
Note that the third EMA is applied within the MACD indicator window. To do this, drag the EMA indicator into the MACD window and, in the indicator settings, select "Previous Indicator's Data" as the applied price:
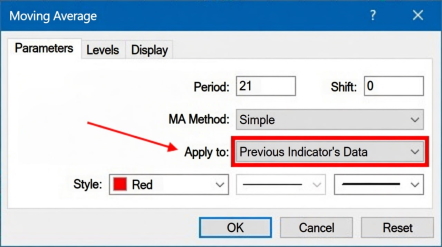
With this setting, the EMA will calculate from the MACD's own values, allowing both to share the same subwindow.
A ready-made template for this strategy can be downloaded at the end of the article.
Expiration and Money Management
The strategy works on any timeframe. The expiration for each trade is 5 candles.
Risk no more than 2% of your account balance per trade — this is the standard money management rule.
Trading Examples
As the examples below show, having multiple indicators on the chart does not create confusion — on the contrary, it makes the signals easier to read. The rules are simple enough for beginners to follow.
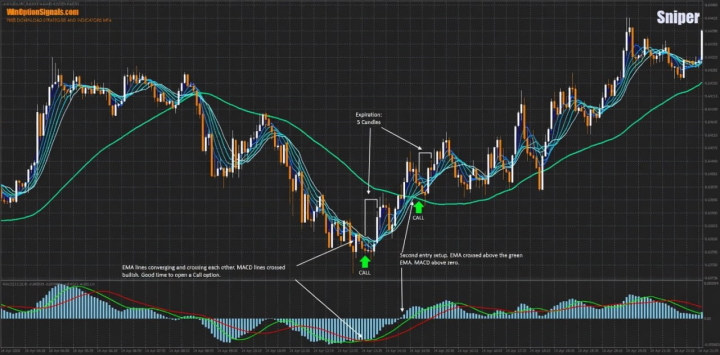
There are two entry setups for each direction. Both are valid signals.
Call option — entry conditions (either setup):
- The blue EMAs cross above the green EMA from below, and MACD crosses above the zero line.
or
- The blue EMAs converge tightly, and the green MACD line crosses above the red line.
Put option — entry conditions (either setup):
- The blue EMAs cross below the green EMA from above, and MACD crosses below the zero line.
or
- The blue EMAs converge tightly, and the green MACD line crosses below the red line.
Call Option Example
Several signals appear in succession here, providing multiple entry opportunities and increasing the potential profit from the move:
Put Option Example
A similar situation here — signals follow one after another, again offering several entry points:

Conclusion
It is easy to see why this strategy is called Sniper. Its signals are precise, and they often appear in clusters — giving traders the opportunity to make several quality trades within a short window.
For accurate quotes and fast order execution, it is important to trade with a reliable broker. You can find one in our binary options broker rankings. Happy trading!
Download the Sniper Strategy Template
Have questions about how this strategy or any of its indicators work? Leave a comment below, and subscribe to our YouTube channel WinOptionCrypto — we answer questions in our videos.

To leave a comment, you must register or log in to your account.